Parts list
| Part | Qty | Approx. | Buy |
|---|---|---|---|
| Arduino Uno R3 (compatible) | 1 | ₹450 | Buy Arduino Uno R3 (compatible) |
| L298N dual motor driver | 1 | ₹150 | Buy L298N dual motor driver |
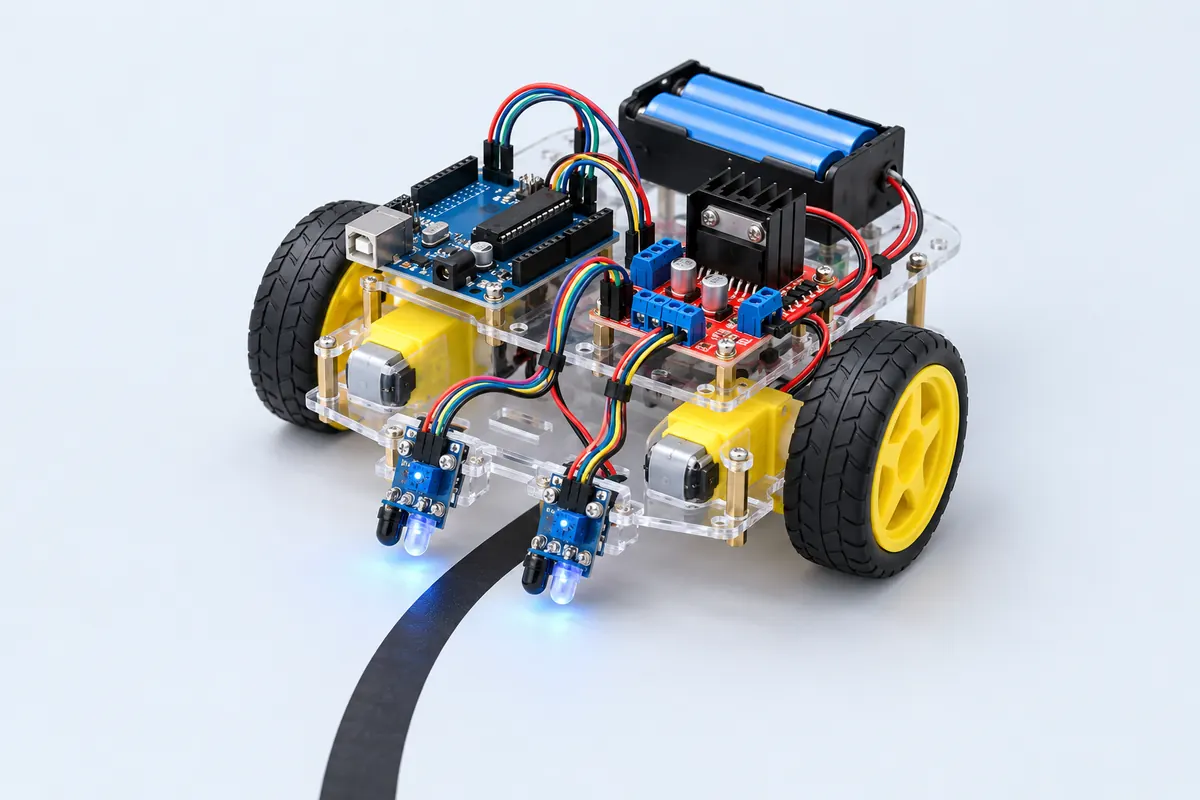
| 2WD robot chassis kit with 2 BO gear motors and wheels | 1 | ₹450 | Buy 2WD robot chassis kit with 2 BO gear motors and wheels |
| 2× 18650 Li-ion cells + holder with switch (7.4 V) | 1 | ₹350 | Buy 2× 18650 Li-ion cells + holder with switch (7.4 V) |
| Jumper wires | 1 | ₹40 | Buy Jumper wires |
| TCRT5000 IR reflective sensor module | 2 | ₹80 | Buy TCRT5000 IR reflective sensor module |
| Black insulation tape for the track | 1 | ₹30 | Buy Black insulation tape for the track |
| Total | ₹1,550 |
Affiliate disclosure: “Buy” links may earn FlashReady a small commission at no extra cost to you. Prices are indicative.
Wiring
| Arduino Uno R3 | Part · pin | Wire | Notes |
|---|---|---|---|
| — | L298N dual H-bridge motor driver · OUT1 | — | To Left motor (+) (not drawn) |
| — | L298N dual H-bridge motor driver · OUT2 | — | To Left motor (−) (not drawn) |
| — | L298N dual H-bridge motor driver · OUT3 | — | To Right motor (+) (not drawn) |
| — | L298N dual H-bridge motor driver · OUT4 | — | To Right motor (−) (not drawn) |
| 5V | TCRT5000 IR reflective sensor module · VCC | red | |
| GND | TCRT5000 IR reflective sensor module · GND | black | |
| D2 | TCRT5000 IR reflective sensor module · DO | yellow | Left sensor |
| 5V | TCRT5000 IR reflective sensor module #2 · VCC | red | |
| GND | TCRT5000 IR reflective sensor module #2 · GND | black | |
| D3 | TCRT5000 IR reflective sensor module #2 · DO | green | Right sensor |
| D5 | L298N dual H-bridge motor driver · ENA | orange | PWM speed, left motor (remove the ENA jumper) |
| A0 | L298N dual H-bridge motor driver · IN1 | yellow | |
| A1 | L298N dual H-bridge motor driver · IN2 | green | |
| D6 | L298N dual H-bridge motor driver · ENB | purple | PWM speed, right motor (remove the ENB jumper) |
| A2 | L298N dual H-bridge motor driver · IN3 | blue | |
| A3 | L298N dual H-bridge motor driver · IN4 | cyan | |
| 5V | L298N dual H-bridge motor driver · 5V | red | L298N’s regulator feeds the Uno’s 5V pin (5V-EN jumper on, battery ≤ 12 V); battery + to the 12V terminal |
| GND | L298N dual H-bridge motor driver · GND | black | Common ground: battery −, L298N and Uno |
| 2× 18650 Li-ion pack (7.4 V) · + | L298N dual H-bridge motor driver · 12V | red | Through the battery holder’s switch. The L298N drops about 2 V, so the motors see ~5.4 V |
| 2× 18650 Li-ion pack (7.4 V) · - | L298N dual H-bridge motor driver · GND | black | Battery −, L298N GND and Uno GND all join here |
Board quirks: Mount the two sensors 5–10 mm above the floor, slightly ahead of the wheels, a little wider apart than the tape so both see white when centred. Turn each module’s trimmer until its LED changes exactly as it crosses from white to black. Li-ion 18650 cells can catch fire if shorted or over-discharged: use a holder with a switch, protected cells, a proper Li-ion charger, and never leave the car charging unattended.
Code
// Line follower robot — Arduino Uno + 2× TCRT5000 IR modules + L298N + 2 DC gear motors.
// The two sensors straddle a black line: the side that sees black steers back towards it.
// Left TCRT5000 DO → D2, right TCRT5000 DO → D3.
// L298N ENA → D5, IN1 → A0, IN2 → A1, ENB → D6, IN3 → A2, IN4 → A3.
constexpr uint8_t LEFT_SENSOR = 2, RIGHT_SENSOR = 3;
constexpr uint8_t ENA = 5, IN1 = A0, IN2 = A1;   // left motor
constexpr uint8_t ENB = 6, IN3 = A2, IN4 = A3;   // right motor
// Most TCRT5000 modules pull DO LOW over a white (reflective) surface and HIGH over black.
constexpr bool LINE_IS_HIGH = true;
constexpr uint8_t FAST = 160, TURN = 140;        // 0–255; the L298N loses ~2 V, so don't go too low

int lastTurn = 0;                                // -1 = last saw the line on the left, +1 = right

void motor(uint8_t en, uint8_t a, uint8_t b, int speed) {
  digitalWrite(a, speed >= 0 ? HIGH : LOW);
  digitalWrite(b, speed >= 0 ? LOW : HIGH);
  analogWrite(en, abs(speed));
}

void drive(int left, int right) {
  motor(ENA, IN1, IN2, left);
  motor(ENB, IN3, IN4, right);
}

bool onLine(uint8_t pin) {
  return (digitalRead(pin) == HIGH) == LINE_IS_HIGH;
}

void setup() {
  const uint8_t outputs[] = {ENA, IN1, IN2, ENB, IN3, IN4};
  for (uint8_t p : outputs) pinMode(p, OUTPUT);
  pinMode(LEFT_SENSOR, INPUT);
  pinMode(RIGHT_SENSOR, INPUT);
  drive(0, 0);
  delay(2000);                                   // time to put it down on the track
}

void loop() {
  bool left = onLine(LEFT_SENSOR), right = onLine(RIGHT_SENSOR);
  if (left && !right) {                          // line drifted left → pivot left
    drive(-TURN, TURN);
    lastTurn = -1;
  } else if (right && !left) {                   // line drifted right → pivot right
    drive(TURN, -TURN);
    lastTurn = 1;
  } else if (!left && !right) {                  // line between the sensors → straight on
    drive(FAST, FAST);
  } else {                                       // both on black: a junction or a wide bend —
    drive(lastTurn * TURN, -lastTurn * TURN);    // keep turning the way we last turned
  }
}
// Line follower robot — Arduino Uno + 2× TCRT5000 IR modules + L298N + 2 DC gear motors.
// The two sensors straddle a black line: the side that sees black steers back towards it.
// Left TCRT5000 DO → D2, right TCRT5000 DO → D3.
// L298N ENA → D5, IN1 → A0, IN2 → A1, ENB → D6, IN3 → A2, IN4 → A3.
constexpr uint8_t LEFT_SENSOR = 2, RIGHT_SENSOR = 3;
constexpr uint8_t ENA = 5, IN1 = A0, IN2 = A1; // left motor
constexpr uint8_t ENB = 6, IN3 = A2, IN4 = A3; // right motor
// Most TCRT5000 modules pull DO LOW over a white (reflective) surface and HIGH over black.
constexpr bool LINE_IS_HIGH = true;
constexpr uint8_t FAST = 160, TURN = 140; // 0–255; the L298N loses ~2 V, so don't go too low
int lastTurn = 0; // -1 = last saw the line on the left, +1 = right
void motor(uint8_t en, uint8_t a, uint8_t b, int speed) {
digitalWrite(a, speed >= 0 ? HIGH : LOW);
digitalWrite(b, speed >= 0 ? LOW : HIGH);
analogWrite(en, abs(speed));
}
void drive(int left, int right) {
motor(ENA, IN1, IN2, left);
motor(ENB, IN3, IN4, right);
}
bool onLine(uint8_t pin) {
return (digitalRead(pin) == HIGH) == LINE_IS_HIGH;
}
void setup() {
const uint8_t outputs[] = {ENA, IN1, IN2, ENB, IN3, IN4};
for (uint8_t p : outputs) pinMode(p, OUTPUT);
pinMode(LEFT_SENSOR, INPUT);
pinMode(RIGHT_SENSOR, INPUT);
drive(0, 0);
delay(2000); // time to put it down on the track
}
void loop() {
bool left = onLine(LEFT_SENSOR), right = onLine(RIGHT_SENSOR);
if (left && !right) { // line drifted left → pivot left
drive(-TURN, TURN);
lastTurn = -1;
} else if (right && !left) { // line drifted right → pivot right
drive(TURN, -TURN);
lastTurn = 1;
} else if (!left && !right) { // line between the sensors → straight on
drive(FAST, FAST);
} else { // both on black: a junction or a wide bend —
drive(lastTurn * TURN, -lastTurn * TURN); // keep turning the way we last turned
}
}Compiled for uno on avr 1.8.8 · 3 Nov 2026
How it works
Each TCRT5000 shines infrared light at the floor and measures how much bounces back. White reflects a lot, black tape very little; the module’s comparator turns that into a clean digital signal on DO, with a trimmer to set the switching point.
The two sensors sit either side of the line. When the robot is centred, both see white and it drives straight. If the line drifts under the left sensor, the robot pivots left until that sensor sees white again; the right sensor does the same for the other side. It’s the classic line-follower logic, and it holds the line on curves that a single sensor can’t.
When both sensors see black — a junction or a very tight bend — the robot keeps turning the way it last turned, which usually carries it round the corner.
The L298N drives the two motors; PWM on ENA and ENB sets their speed, and running one wheel backwards makes a sharp pivot. Start with the speeds in the sketch, then tune them for your chassis and floor. The motors run from the 7.4 V Li-ion pack through the L298N, which also feeds the Uno’s 5 V rail.
Troubleshooting
It turns away from the line instead of towards it
The sensors are swapped or your modules output the opposite sense. Swap the D2/D3 wires, or flip LINE_IS_HIGH.
It overshoots and loses the line on bends
Lower FAST and TURN, move the sensors closer to the wheels’ axle, or use wider tape.
The Uno resets when the motors start
The L298N drops about 2 V and the motors pull a surge on start-up. Use healthy, fully charged cells, keep the 5V-EN jumper fitted, and add a 470 µF capacitor across the Uno’s 5V and GND.
Upgrades
- Add a third, centre sensor and use proportional (PID) steering for faster laps.
- Add an HC-SR04 to stop for obstacles on the track.
- Time laps with a light gate and show them on an LCD.